Monday, February 24, 2014
VANCOUVER SNOW FALL winter photographs
Yesterday I mentioned our big snow fall, well I made sure I got the evidence to show you.

All these photos were taken in our yard.
I was playing with some editing features on the pictures when the big oil truck
arrived to deliver our furnace fuel. Earlier that day I had shoveled the regular pathway to the tank
through the thick snow. Little did I know the only one to benefit from this would be me.
In the form of a good workout.

We ordered the fuel long before the snow was forecast and now I was
worried there would be some trouble getting the truck up the driveway.
George told me not to worry but he was also not going to be home
to deal with the delivery if anything went wrong.

The beginning of our driveway has a quick incline but the driver made it up first try.
(YAHOO!)
Unfortunately he needed to be turned around to access the filler hose.
So he backed down the driveway and turned around on the road to make a second attempt.

He informed me we had to use the shortest route to the tank
due to a shorter filler hose then they normal carry.
This meant stopping the truck in the middle of the incline
and then hoisting the hose up a bank and dragging it through the heavy snow.
(THIS DIDNT SOUND GOOD)

The driver stopped the truck and had to set some things up from inside the cab leaving me to freeze on the bank for almost 10 minutes. When he finally got out to open the side to access the hose
the truck started to slide on its own down the driveway as he stood in shock watching.
I was looking down watching this whole process kinda like a movie going wrong.

Now dont worry ...
just then he found his wits and managed to hop back in the cab and get control of the situation.
But now with all the tire treads on the snow it was pretty packed down and slick.
(THIRD TIMES A CHARM?)
He started from the bottom again.

He finally managed to position the truck tires in the heavier part of the snow.
Working together we dragged the hose up the bank, through the deep snow all the way to the tank
and we got the tank filled. All the while hoping the truck wasnt going to move on its again.
(WE DID IT!)
Guess who arrived home just as we finished getting the hose
back through the snow down the hill to the truck.
(WELCOME HOME GEORGE)
"No you didnt miss anything honey"
Beachy Subway Art 2
I just finished my second subway art project. Its been sittin for awhile.
All of the beach names where stenciled and painted by hand.
Yessiree Bob it is quite the time suck.


I just used some pieces of Douglas Fir wood, attach them together from the back, sand,
stain (walnut) and gave em quick coat of ASCP Pure White.
I did the stenciling in 2 different fonts using the 2" and 3".
After penciling all the names, I went back in with an artist brush and used
graphite color chalk paint to fill in the names. After it was dry, I used a sanding block
to distress the words and gave it coat of clear and dark waxes.
Easy but time consuming.

It needs a home. Not mine.

Sunday, February 23, 2014
LOOKING FOR GREAT HARDWARE etsy additions
I swear Im going to be stealing from the Etsy
stock more than I should. Just look at how amazing some
of the firstfinds inventory is ...

french hardware back plates
There is a nice selection of shabby chic hardware that can be used in all sorts of projects.

daisy pulls
You could mount these chippy daisy knobs on a reclaimed board to make a cute coat hanger
for a girls bedroom.

Oval Ribbon & Sheath knobs
If you only want a couple from a larger set,
I will split them up for you, just let me know.


8 geometric handles
Ornate swirly knobs
Aztec sun knobs
Snowflake knobs
There is a large assortment of Chippendale handles to choose from, with more coming.


3 Curvy Chippendale swing handles
3 Pointy Chippendale swing handles
2 Chippendale swing handles

You can use these 4 back plates (shown below with glass knobs)
to enhance a set of knobs you already have.
They can also be used vertically on cabinet doors.

4 decorative hardware back plates
So hurry on over to firstfinds and make this girl happy.
How to build a Lumber Rack Video Better than free plans!
I definately needed a lumber rack in my new small shop so I got to looking around the internet at other peoples ideas and builds and most of them seemed pretty complicated or they protruded out from the wall to much for my small shop.
I came up with a simple but strong design that doesnt force you to sacrifice space nor does it take alot of tools, materials, or complicated jointery to build. In my small shop I am trying to put alot of things on wheels and this lumber rack is not built all the way to the floor so that I can roll tools underneathe it.
So take some time to watch this video and build yourself a great lumber rack.
I do consider this a meduim duty lumber rack but you could easily add two more uprights with supports between these making them 16" on center rather than my 32" on center. This would add alot of extra strength is you decided to load it up excessively.
Read More..
I came up with a simple but strong design that doesnt force you to sacrifice space nor does it take alot of tools, materials, or complicated jointery to build. In my small shop I am trying to put alot of things on wheels and this lumber rack is not built all the way to the floor so that I can roll tools underneathe it.
So take some time to watch this video and build yourself a great lumber rack.
I do consider this a meduim duty lumber rack but you could easily add two more uprights with supports between these making them 16" on center rather than my 32" on center. This would add alot of extra strength is you decided to load it up excessively.
Saturday, February 22, 2014
Exploring the Libella
Recently Ive been building shop made wooden squares. I was inspired to start by the English Layout Square featured in a recent Popular Woodworking magazine article. After some discussion with other woodworkers I was further inspired to drill a hole in the squares apex and hang a string with a plumb bob from it. Making what I have been calling an A-frame square
 You can read all about this square and the build by clicking HERE.
After I posted two things happened,
1) I had a well deserved question about the use of this tool, I think that I had difficulty communicating some things about it, mostly because I dont think I had a good grasp on the multiple complexities that can come from such an ancient tool.
2) A little bit of my pride reared its head and I felt compelled to shoot an email of to Chris Schwarz to show off a bit, He wrote back and told me that the actual name of the tool I had made was called a Libella.
In the comments I was gracefully rescued from my own ignorance by this:
 I tried to do a little research on the internet about further uses for the Libella or the A-frame square and I came up with very little to show for it. So in place of research I took to the shop to put in some hands on fooling around starting with the list supplied by David.
After a couple hours I decided to shoot a quick video on some of the things I had figured out that afternoon. So even though I dont go to moving picture too often, here is a quick shot on exploring the Libella.
Cheers
Oldwolf
Read More..
After I posted two things happened,
1) I had a well deserved question about the use of this tool, I think that I had difficulty communicating some things about it, mostly because I dont think I had a good grasp on the multiple complexities that can come from such an ancient tool.
2) A little bit of my pride reared its head and I felt compelled to shoot an email of to Chris Schwarz to show off a bit, He wrote back and told me that the actual name of the tool I had made was called a Libella.
In the comments I was gracefully rescued from my own ignorance by this:
After a couple hours I decided to shoot a quick video on some of the things I had figured out that afternoon. So even though I dont go to moving picture too often, here is a quick shot on exploring the Libella.
Cheers
Oldwolf
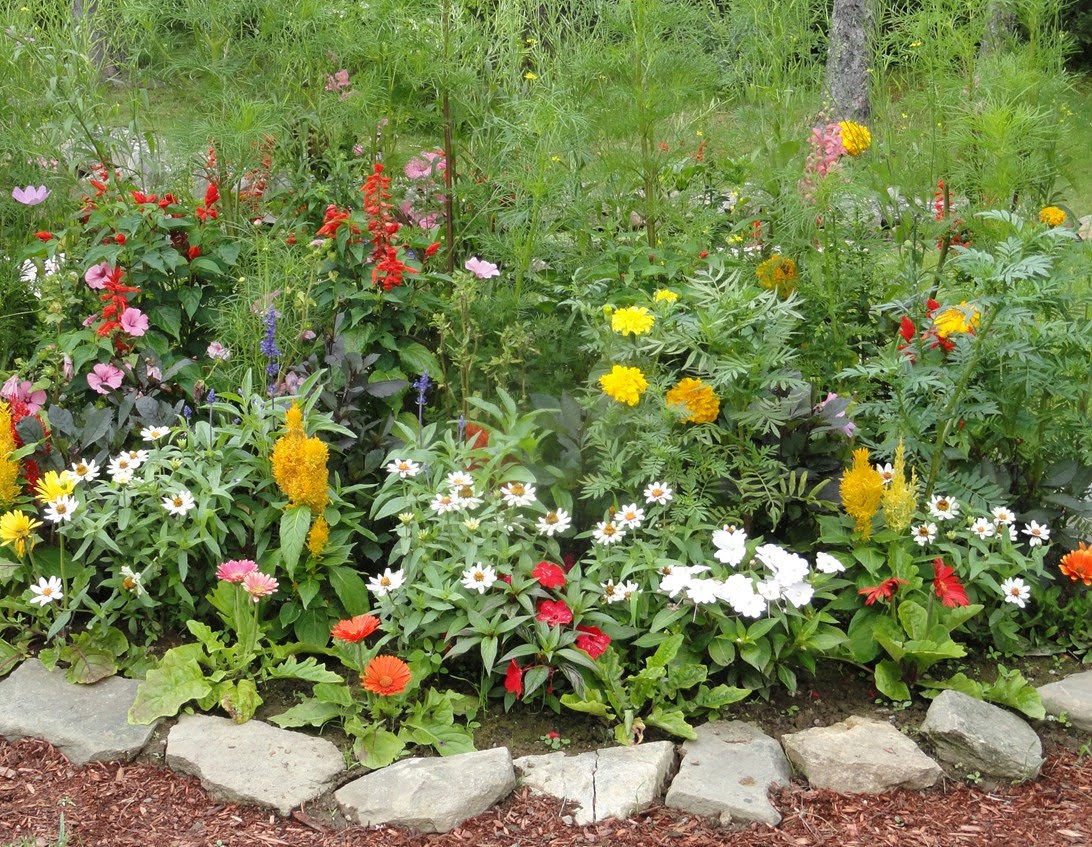
Rustic Flower Garden Ideas
Flower Garden Ideas Plants Photograph | Flower Garden Ideas
Flower Garden Ideas

Free Flower Garden Ideas Photograph | Free Flower Pictures
Home -> Flower Garden Ideas
Read More..
Flower Garden Ideas
Free Flower Garden Ideas Photograph | Free Flower Pictures
Home -> Flower Garden Ideas
Workshop Reloaded Version 5 0
I have used several versions of the Oldwolf Workshop over the years. The first incarnation was a nice basement shop, about 15 foot wide by 25 foot long area, a nice big space that I utilized, but not necessarily efficiently. I was still learning. I havent been able to find any real pics of that shop, documenting things like that never occurred to me at the time. In fact documenting my work at all only started around a year ago, when I joined Lumberjocks and started up this blog. I really like keeping up on the recording what Ive done and how Ive accomplished it both in photo and words, it allows me the chance to go back and revisit an idea and see what changes Ive made, or even re-experience the process a little.
Then we moved across town.
My second incarnation Version 2.0 was a combination garage / basement shop. I kept the main area of the shop in a 2 car garage and worked there 3/4 of the year, then I had a small workshop area and workbench in the basement where I did some smaller joinery work and carving and small stuff during the colder months. Here is where I began to get serious about my woodworking.
Then we moved from Wisconsin to Maine.
Here, in Version 3.0, I went back to the basement again. This is probably the most well thought out shop and my favorite set up so far I have had yet, It was here I built my first real workbench, and set up a smaller shop than others I had used before, only using a little more than a quarter of the basement, but it was the most efficient shop I have run to date. Everything within a couple steps of everything else. Now I had downsized some equipment and what not to make the move so I had less to fill the shop as well. You can see some pics of that version in older posts on this blog and also on the family blog I kept up while we were in Maine, click HERE to see it. The biggest downside to this shop, and something I dont miss, is that the basement had 1 plug for the whole area, located over by the washing machine. So I worked with one long extension cord across the basement and under my feet all the time. Is it any wonder I started to become more interested in hand tools while we lived there?
Then we moved from Maine, back home to Wisconsin.
Long story made short, Theres no place like home. Here we moved into a small 2 bedroom upstairs apartment in a duplex, with a small 5 foot by 9 foot storage area at the bottom of our steps that became Version 4.0 a.k.a The Woodshop Jr. I caught the hand tool bug a little while we were living in Maine and here I have been able to focus on really learning to use them. That is the positive of the shop. The negative is the size and limitations. It drives me nuts most days, as does the too small living quarters for my family of five.
Now we are planing to move again.
We have been aproved for a nice, big 3 bedroom apartment in some new construction in LaCrosse, Its inside an downtown apartment complex way up on the fifth floor above the city. (5th floor is way up for the city of LaCrosse) the positive, more room for the family, the downside no room for a shop, To the rescue, like a superhero, comes my dad, "Papa Wolf". He has a large size steel shed he built in his back yard back in 01, its the size of a small trailer house. He has used it for a shop of his own and storage space, but he recently decided he wanted to relocate his shop stuff to the basement of the house so its closer and more convenient for him, especially in the winter.
Knowing that I was in this predicament, he offered to let me use most of the shed to set up my shop, and gave permission for me to cut some holes to install a wood burning stove so I can work there year round. This is going to be an interesting experience for me on several levels.
One, I have never lived in one space and had my shop more than 100 feet from my bed. This means that my shop time will be easier to focus while I am there with less distractions, but it will cut down on my ability to "take 5 minutes" and do something quick. All in all I think that this will be a good stepping stone to the eventuality of starting my own shop / store and making a living doing custom woodworking, which is the eventual goal here. The trick will be deciding an amount of hours to dedicated to the shop and sticking to it, say 16 hours a week, two 4 hour days after work and one weekend day. That seems like a reasonable balance between hobby and home.
Two, I will not be setting up one shop for this project, I will actually be helping set up two shops, mine and Papa Wolfs, Mine, of course, mostly dedicated to woodworking, His being more of a general purpose workshop, but he has plans, he was talking to me about what he wants for workbench set up yesterday. (hmmm...I wonder how many workbenches one would need to build to be on par with Chris Schwarz?)
Three. I will be setting up wood burning stove that I have hailed around from place to place for years, doing this safely in a wood shop will be interesting as well as planning out measures to deal with condensation and other problems in a shop that will not be consistently heated in the winter, just intermittently when Im there. Shop wiring and lighting will be a hurdle to deal with as well. Lighting is a constant issue when moving to a new shop, but wiring will be a new one for me.
 And there will be several more hurdles Im sure, but hands down it will be good to be into a new shop soon, I miss my table saw some, but I miss my full size workbench more. I have spent several hours thinking and planning what to do with the space, and though there will changes, I have a starting plan, probably for the first time ever :) I spent a couple hours playing with a great online shop set up tool put out there for free use from Grizzly Tools, The drawback for me is that the tool footprints they have are all their own tools (duh) so those thing do not fall out exact to what my stuff is, But I was able to get it very close. Here is what I have so far
You will see in the plan one of Papa Wolfs caveats for using his shed. . . that I left room for him to park the riding lawnmower. I can push it out while Im working and there will be no problems with this Im sure.
If you want to check out the shop planning tool for yourself, even just to play around you can click HERE, I may even try to play around with this on SketchUp before Im done, It might be a good starting place to learn how to really use that tools as well.
The following pics are progress shots from working with Papa Wolf on clearing out some of the shed yesterday and getting some stuff from the house to the basement. To see the before pics you can check out my post showing them here.
Cheers
Oldwolf


Read More..
Then we moved across town.
My second incarnation Version 2.0 was a combination garage / basement shop. I kept the main area of the shop in a 2 car garage and worked there 3/4 of the year, then I had a small workshop area and workbench in the basement where I did some smaller joinery work and carving and small stuff during the colder months. Here is where I began to get serious about my woodworking.
Then we moved from Wisconsin to Maine.
Here, in Version 3.0, I went back to the basement again. This is probably the most well thought out shop and my favorite set up so far I have had yet, It was here I built my first real workbench, and set up a smaller shop than others I had used before, only using a little more than a quarter of the basement, but it was the most efficient shop I have run to date. Everything within a couple steps of everything else. Now I had downsized some equipment and what not to make the move so I had less to fill the shop as well. You can see some pics of that version in older posts on this blog and also on the family blog I kept up while we were in Maine, click HERE to see it. The biggest downside to this shop, and something I dont miss, is that the basement had 1 plug for the whole area, located over by the washing machine. So I worked with one long extension cord across the basement and under my feet all the time. Is it any wonder I started to become more interested in hand tools while we lived there?
Then we moved from Maine, back home to Wisconsin.
Long story made short, Theres no place like home. Here we moved into a small 2 bedroom upstairs apartment in a duplex, with a small 5 foot by 9 foot storage area at the bottom of our steps that became Version 4.0 a.k.a The Woodshop Jr. I caught the hand tool bug a little while we were living in Maine and here I have been able to focus on really learning to use them. That is the positive of the shop. The negative is the size and limitations. It drives me nuts most days, as does the too small living quarters for my family of five.
Now we are planing to move again.
We have been aproved for a nice, big 3 bedroom apartment in some new construction in LaCrosse, Its inside an downtown apartment complex way up on the fifth floor above the city. (5th floor is way up for the city of LaCrosse) the positive, more room for the family, the downside no room for a shop, To the rescue, like a superhero, comes my dad, "Papa Wolf". He has a large size steel shed he built in his back yard back in 01, its the size of a small trailer house. He has used it for a shop of his own and storage space, but he recently decided he wanted to relocate his shop stuff to the basement of the house so its closer and more convenient for him, especially in the winter.
Knowing that I was in this predicament, he offered to let me use most of the shed to set up my shop, and gave permission for me to cut some holes to install a wood burning stove so I can work there year round. This is going to be an interesting experience for me on several levels.
One, I have never lived in one space and had my shop more than 100 feet from my bed. This means that my shop time will be easier to focus while I am there with less distractions, but it will cut down on my ability to "take 5 minutes" and do something quick. All in all I think that this will be a good stepping stone to the eventuality of starting my own shop / store and making a living doing custom woodworking, which is the eventual goal here. The trick will be deciding an amount of hours to dedicated to the shop and sticking to it, say 16 hours a week, two 4 hour days after work and one weekend day. That seems like a reasonable balance between hobby and home.
Two, I will not be setting up one shop for this project, I will actually be helping set up two shops, mine and Papa Wolfs, Mine, of course, mostly dedicated to woodworking, His being more of a general purpose workshop, but he has plans, he was talking to me about what he wants for workbench set up yesterday. (hmmm...I wonder how many workbenches one would need to build to be on par with Chris Schwarz?)
Three. I will be setting up wood burning stove that I have hailed around from place to place for years, doing this safely in a wood shop will be interesting as well as planning out measures to deal with condensation and other problems in a shop that will not be consistently heated in the winter, just intermittently when Im there. Shop wiring and lighting will be a hurdle to deal with as well. Lighting is a constant issue when moving to a new shop, but wiring will be a new one for me.
And there will be several more hurdles Im sure, but hands down it will be good to be into a new shop soon, I miss my table saw some, but I miss my full size workbench more. I have spent several hours thinking and planning what to do with the space, and though there will changes, I have a starting plan, probably for the first time ever :) I spent a couple hours playing with a great online shop set up tool put out there for free use from Grizzly Tools, The drawback for me is that the tool footprints they have are all their own tools (duh) so those thing do not fall out exact to what my stuff is, But I was able to get it very close. Here is what I have so farYou will see in the plan one of Papa Wolfs caveats for using his shed. . . that I left room for him to park the riding lawnmower. I can push it out while Im working and there will be no problems with this Im sure.
If you want to check out the shop planning tool for yourself, even just to play around you can click HERE, I may even try to play around with this on SketchUp before Im done, It might be a good starting place to learn how to really use that tools as well.
The following pics are progress shots from working with Papa Wolf on clearing out some of the shed yesterday and getting some stuff from the house to the basement. To see the before pics you can check out my post showing them here.
Cheers
Oldwolf
Friday, February 21, 2014
Decorating Your Garden Ideas
Soothing Garden Pond Simply Decor Ideas for Freshen up Your Patio ...
garden decorating ideas, pond

Home Garden - Modern Homes Interior Design and Decorating Ideas on ...
DIY Decorating Your Garden and

Read More..
garden decorating ideas, pond
Home Garden - Modern Homes Interior Design and Decorating Ideas on ...
DIY Decorating Your Garden and
Eclectic Garden Design
Beautiful News ... for the future of your garden | Lost In The Flowers
In the eclectic garden beauty,

Eclectic Sculptures | Landscaping | Falling Water Designs : Garden ...
Eclectic Sculptures

Read More..
In the eclectic garden beauty,
Eclectic Sculptures | Landscaping | Falling Water Designs : Garden ...
Eclectic Sculptures
Thursday, February 20, 2014
Garden Mosaics
Mosaics are not only used to decorate walls, ceiling, and floors. At present, garden mosaics is also becoming quite popular.
If you have time, why don’t you try creating your very own unique mosaic birdbaths, stepping stones, benches, and many others. Mosaic kits are widely available in almost all hardware stores so that you will not have a hard time in finishing your artworks.
For the stepping stones, there are lots of designs to choose from. The stones are available in different shapes including hexagon, square, and round. If you shop around, you can find ready-made mosaic stepping stones but if you want create your own mosaic, you can purchase the kits that come with a glass design, background, mortar, and glue. Some of the most common designs for the stepping stones are flamingo, sunflowers, bouquet, bluebonnets, frog, rabbit, butterfly, fairy, and birdhouse.
Birdfeeders are mostly found in gardens. You can make your birdfeeder more attractive by creating a mosaic. You can use fused glass and terracotta for the mosaic but you can also use other tesserae of your choice. For the birdbaths, you can create the mosaic on the bath itself. There are lots of designs that you can choose from like spring flowers, butterflies, angels, bluebonnets, and sunflower. If this is your first time, try to use a simple design. After you’ve finished with your mosaic, the birds will surely be attracted at the colorful mosaic of the bath.
If you have a concrete bench in your garden, you can also use it to create a mosaic art. It’s easy. First, you need to clean the bench surface. After that, you will now decide a theme, a pattern, or an image to sketch on it. Make it simple like a garden house, a bunch of flowers, or any other pattern. Go to your local hardware store and purchase the needed materials to create the mosaic. Choose the colors carefully and the tesserae that you will be using. Since you will be creating the mosaic for the outdoor, get a suitable adhesive to attach the tiles and get a colored grout.
Check if the tiles fit into the details of the drawing or image. You can use a tile nipper to cut the tiles into smaller pieces. Alchoices observe safety by using gloves and goggles. Place the tiles on the design and attach the tiles one after the other. It would be best to divide the bench into sections. Apply the adhesive by section, and then attach the tiles.
Leave the tiles to dry for a day or two. Mix the grout and spread it on the spaces between the tiles. Clean the surface with a damp cloth or sponge to get rid of excess grout. Leave the mosaic to cure for a couple of days. Soon you will have a mosaic bench.
Aside from the bench, you can also create mosaics on terracotta pots. You can create the mosaic on one part of the pot or you can do it all over the pot. Mosaic pots are also available for sale but you can save a lot of money by creating your own mosaic pots. The procedure is just the same as the bench mosaic.
You can bring mosaics to the outdoors. If you have a garden, turn it into a garden mosaic. Just be creative and bring out the artist in you.
Read More..
If you have time, why don’t you try creating your very own unique mosaic birdbaths, stepping stones, benches, and many others. Mosaic kits are widely available in almost all hardware stores so that you will not have a hard time in finishing your artworks.
For the stepping stones, there are lots of designs to choose from. The stones are available in different shapes including hexagon, square, and round. If you shop around, you can find ready-made mosaic stepping stones but if you want create your own mosaic, you can purchase the kits that come with a glass design, background, mortar, and glue. Some of the most common designs for the stepping stones are flamingo, sunflowers, bouquet, bluebonnets, frog, rabbit, butterfly, fairy, and birdhouse.
Birdfeeders are mostly found in gardens. You can make your birdfeeder more attractive by creating a mosaic. You can use fused glass and terracotta for the mosaic but you can also use other tesserae of your choice. For the birdbaths, you can create the mosaic on the bath itself. There are lots of designs that you can choose from like spring flowers, butterflies, angels, bluebonnets, and sunflower. If this is your first time, try to use a simple design. After you’ve finished with your mosaic, the birds will surely be attracted at the colorful mosaic of the bath.
If you have a concrete bench in your garden, you can also use it to create a mosaic art. It’s easy. First, you need to clean the bench surface. After that, you will now decide a theme, a pattern, or an image to sketch on it. Make it simple like a garden house, a bunch of flowers, or any other pattern. Go to your local hardware store and purchase the needed materials to create the mosaic. Choose the colors carefully and the tesserae that you will be using. Since you will be creating the mosaic for the outdoor, get a suitable adhesive to attach the tiles and get a colored grout.
Check if the tiles fit into the details of the drawing or image. You can use a tile nipper to cut the tiles into smaller pieces. Alchoices observe safety by using gloves and goggles. Place the tiles on the design and attach the tiles one after the other. It would be best to divide the bench into sections. Apply the adhesive by section, and then attach the tiles.
Leave the tiles to dry for a day or two. Mix the grout and spread it on the spaces between the tiles. Clean the surface with a damp cloth or sponge to get rid of excess grout. Leave the mosaic to cure for a couple of days. Soon you will have a mosaic bench.
Aside from the bench, you can also create mosaics on terracotta pots. You can create the mosaic on one part of the pot or you can do it all over the pot. Mosaic pots are also available for sale but you can save a lot of money by creating your own mosaic pots. The procedure is just the same as the bench mosaic.
You can bring mosaics to the outdoors. If you have a garden, turn it into a garden mosaic. Just be creative and bring out the artist in you.
A new venture kinda like roll your own only different
I know I said that the next time I blogged I would say something about my riff on the Dominy clock, as seen and done by the big man in plaid, It was very enjoyable to do the basic construction but the move and lack of heated shop will hold off the finishing process for a while, not to mention a lack of funds to purchase a quartz movement... sigh... oh well, we move forward, and the clock shall sit in the corner of the living room, built but unfinished, at least until summer.
All that to the side, I will explain my new mission! If you dont know, I dont think I have advertised this too much on this blog, other than my family there are 2 passions in my life. One of course is making sawdust. The other is viking age and medieval reenactment. For those of you possibly unfamiliar with the concept. Reenactment has to do with studying history and attempting to recreate an experience similar to that time in history, hopefully for yourself to experience, but usually, and probably more importantly, to help share that knowledge and experience youve gathered reliving and studying the lifestyle to those in the general public. I could talk forever about viking age history, as much or more than woodworking, but I will just stop here with most of it and say if you want to learn more about that side of my life you can go to the web page for the group I co-founded in 1996 by clicking on our name "Tribe Woden Thor"
Our group does several school, library, and festival events each year. Where we set up different aspects of what life was like, from the knight to the lord to the common man, then we interact with those who come visit us to teach them what we can. For a long time I have wanted to set my sword and spear to the side and set up a display that demonstrates a combination of both my woodworking and historical lives. My vision is to set up a small workbench with a tool station behind, and spend the weekend of the festival, woodworking, with as close to period tools as I can get. (there is evidence of viking age woodworking tools... Google "mastermyr chest") Realistically my tool set up will be closer to 16th to 18th century, with the exception that I hope to procure and use spoon augers instead of twist augers.
Again, the usual hurdle will be finances... The hand tools that I have been able to collect to this point are pretty modern looking, plastic handles being the most obvious anachronism. I have tried to make several bargain purchases via eBay, but things always get bid up higher that I want to go. Saws will be the biggest thing for me to tackle. chisels and planes I have, or can work on. The saws I use in my handwork all look like crap. Then, this morning whilst lazing around in bed and listening the magical sounds of my children diplomatically discussing the programming outline of their Saturday morning, I had a small epiphany of sorts. Why not modify my current tools to look and work with wooden handles. Certainly I can build versions of these tools more economically than searching for and buying them online, antique store, or otherwise.

So the next few steps of this web experiment...blog of my work and methods, will indeed follow me as I embark on the attempt to create, some from existing tools, some from scratch. I believe I am going to start with saws, as I believe that to be my most immediate and needed area of improvement, First I want to modify my Vaughan Bear back saw into a wooden handle beast of burden. I will permanently remove the plastic removable handle forever and place a handle similar to this Lie Nielsen Dovetail Saw.
I will also modify my flexible flush cut saw (my favorite saw!!) to have a wooden handle , change the handle on mt least favorite saw, a jack brothers dovetail saw that currently switches from a left hand to a right hand grip (This is the first saw I bought and it has never cut well, but then again I didnt know anything at the time) and I am going to attempt to build both a bow saw and a tenon saw from scratch. This project will also include teaching myself to sharpen and possibly modify the teeth of these saws and to sharpen the teeth of my full size crosscut and rip hand saws inherited from my wifes grandfather.
Im sure there will be other projects to follow, A wooden brace, making my own wood planes, those things come to mind immediately, there will be more.
So this all being explained, there will be more to write when there is something done... Hoping maybe Tuesday Ill have a chance to start!! As usual I will take a ton of pics and try to update this regularly, I know I know, best laid plans of somebody and that other guy... but I will try. Until then, happy sawdust everyone!
D
Read More..
All that to the side, I will explain my new mission! If you dont know, I dont think I have advertised this too much on this blog, other than my family there are 2 passions in my life. One of course is making sawdust. The other is viking age and medieval reenactment. For those of you possibly unfamiliar with the concept. Reenactment has to do with studying history and attempting to recreate an experience similar to that time in history, hopefully for yourself to experience, but usually, and probably more importantly, to help share that knowledge and experience youve gathered reliving and studying the lifestyle to those in the general public. I could talk forever about viking age history, as much or more than woodworking, but I will just stop here with most of it and say if you want to learn more about that side of my life you can go to the web page for the group I co-founded in 1996 by clicking on our name "Tribe Woden Thor"
Our group does several school, library, and festival events each year. Where we set up different aspects of what life was like, from the knight to the lord to the common man, then we interact with those who come visit us to teach them what we can. For a long time I have wanted to set my sword and spear to the side and set up a display that demonstrates a combination of both my woodworking and historical lives. My vision is to set up a small workbench with a tool station behind, and spend the weekend of the festival, woodworking, with as close to period tools as I can get. (there is evidence of viking age woodworking tools... Google "mastermyr chest") Realistically my tool set up will be closer to 16th to 18th century, with the exception that I hope to procure and use spoon augers instead of twist augers.
Again, the usual hurdle will be finances... The hand tools that I have been able to collect to this point are pretty modern looking, plastic handles being the most obvious anachronism. I have tried to make several bargain purchases via eBay, but things always get bid up higher that I want to go. Saws will be the biggest thing for me to tackle. chisels and planes I have, or can work on. The saws I use in my handwork all look like crap. Then, this morning whilst lazing around in bed and listening the magical sounds of my children diplomatically discussing the programming outline of their Saturday morning, I had a small epiphany of sorts. Why not modify my current tools to look and work with wooden handles. Certainly I can build versions of these tools more economically than searching for and buying them online, antique store, or otherwise.
So the next few steps of this web experiment...blog of my work and methods, will indeed follow me as I embark on the attempt to create, some from existing tools, some from scratch. I believe I am going to start with saws, as I believe that to be my most immediate and needed area of improvement, First I want to modify my Vaughan Bear back saw into a wooden handle beast of burden. I will permanently remove the plastic removable handle forever and place a handle similar to this
Lie Nielsen Dovetail Saw.I will also modify my flexible flush cut saw (my favorite saw!!) to have a wooden handle , change the handle on mt least favorite saw, a jack brothers dovetail saw that currently switches from a left hand to a right hand grip (This is the first saw I bought and it has never cut well, but then again I didnt know anything at the time) and I am going to attempt to build both a bow saw and a tenon saw from scratch. This project will also include teaching myself to sharpen and possibly modify the teeth of these saws and to sharpen the teeth of my full size crosscut and rip hand saws inherited from my wifes grandfather.
Im sure there will be other projects to follow, A wooden brace, making my own wood planes, those things come to mind immediately, there will be more.
So this all being explained, there will be more to write when there is something done... Hoping maybe Tuesday Ill have a chance to start!! As usual I will take a ton of pics and try to update this regularly, I know I know, best laid plans of somebody and that other guy... but I will try. Until then, happy sawdust everyone!
D
Wednesday, February 19, 2014
A Separation of Status
I have one more series of thoughts on the William and Mary Book Stand I recently completed. As I was pondering the finish of the piece I spent a little more time on Chuck Benders site to get a look at how he did the finish. He took a little bit different of an approach than I did, creating a finish that looks aged, but what I began to really notice was the finish pictures he had staged of his piece. Pictures just like this:
 Now he also had a picture of the original piece. that picture was staged very similar to the picture of his work.
 So I figured I had to keep up the tradition and stage a similar picture of my own. I wanted to personalize it somewhat though. I didnt have a nifty chip carved box or a blue glass vessel to show off in the picture. I thought about it quite a while. I wanted some items that represented me and yet, I also wanted to do something that was an update on the piece itself.

This is a piece with its roots in a different era, a time when books were a status symbol of wealth and affluence. The other day I was sitting in our local Barnes and Nobles with my wife. We each were enjoying a quiet moment together in the coffee shop area, each of us paging through a book.
Im not sure if everyone remembers such antiques as books but they are made of paper with words printed right on the page. The words dont move, light up, or hyperlink to a web page, but they can be highly entertaining. On the whole, I recommend books!
But while we sat there I took my eyes from the print in front of me to take a sip of my lemonade, and I happened to look around me. We were not alone, at least six other tables were occupied and we were the only ones with books in our hands, the rest of the tables were a collection of different digital tablets and readers and one dude with another antique known as a laptop.
In 1711 a book was a status symbol, in 2011, to my sometimes chagrin, the tablet reader is the new status symbol of the literary world. So I borrowed an tablet reader from a friend and used it to set up this picture. For what its worth, Id rather see a book on the stand.
Ratione et Passionis
Oldwolf
Read More..
This is a piece with its roots in a different era, a time when books were a status symbol of wealth and affluence. The other day I was sitting in our local Barnes and Nobles with my wife. We each were enjoying a quiet moment together in the coffee shop area, each of us paging through a book.
Im not sure if everyone remembers such antiques as books but they are made of paper with words printed right on the page. The words dont move, light up, or hyperlink to a web page, but they can be highly entertaining. On the whole, I recommend books!
But while we sat there I took my eyes from the print in front of me to take a sip of my lemonade, and I happened to look around me. We were not alone, at least six other tables were occupied and we were the only ones with books in our hands, the rest of the tables were a collection of different digital tablets and readers and one dude with another antique known as a laptop.
In 1711 a book was a status symbol, in 2011, to my sometimes chagrin, the tablet reader is the new status symbol of the literary world. So I borrowed an tablet reader from a friend and used it to set up this picture. For what its worth, Id rather see a book on the stand.
Ratione et Passionis
Oldwolf
Boat Building With Wooden Boat Blueprints

You will get wooden boat woodworking plans with regard to canoes, kayaks, or flat bottom boats. You may want to build a vintage jetski or a level bottom Jon Boat with regard to fishing. Youll be able to design boats via 1957 or possibly a large seashore skiff. You might also build an old-fashioned universal boat so that you can reveal the experience along with another.
As an example, if you would like to create a simple wooden boat, youll be able to construct along with little composition over the course of every day if you have the moment. You will need a number of tools together with a chisel, sludge hammer, plane, found, and a large drift. Additionally you need resources such as the pine to create the edges, spruce solid wood to make the keel, come, transom (or strict) and reduce, pine as well as cedar items to make the bottom part planking and four seating, a thin metallic sheet to the mold remain and string cotton playing baseball or an outdated sheet for your white steer. You can also decide to power the particular boat with an outboard or perhaps oars.
A small twelve-inch inboard boat is the identical but it includes a V-hull for less difficult maneuvering. It can be meant to be operated with an outboard. Youll need similar supplies for the inboard because you would for your small boat and also accommodate your motor. In such cases, you need things like the inventory for patio framing, hatch out cut from the deck cell, throttle handle, plexiglass windshield, gas tank, and external plywood deck. Its also wise to have, shear secure, chine, pipe along with elbow deplete system, strength head, silicone gasket, stock music group sawed for the base, keelson, gearshift control, plywood flooring, exterior plywood facets and bottom part. Plywood transom, stock surrounding or mounting stock, rudder about rod, engine mount screws, control cable television and pulleys, five-horsepower Scott-Atwater decrease unit plus a cutout for that shift fly fishing rod, drive the whole length and normal water passage may also be a must.
Naturally, you can build larger or more intricate boats for instance a cabin casual riding, a 15-foot boat, or a Biloxi dinghy. Its also possible to find wooden boat blueprints with regard to recreational watercraft such as submarines, power-driven surfboards, bike boats or even a foot pedal catamaran.
Greg Saint. Clair is an enthusiastic boat lover as well as boat building enthusiast. For additional great info on wooden boat blueprints.
Tuesday, February 18, 2014
DIY Table Top Photo Studio Plans
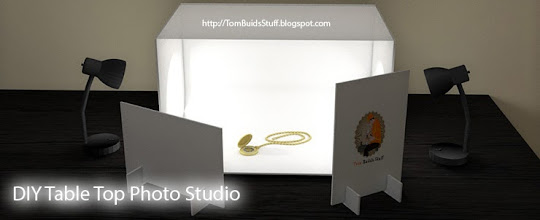
Every so often I try to get rid of things I dont need any more by selling them on Ebay or Craigslist. Ive found that having good photos helps items sell faster and get better prices so I made this little table top light box to take better product photos. It was made mostly of things I had lying around. Here are plans to build one yourself.
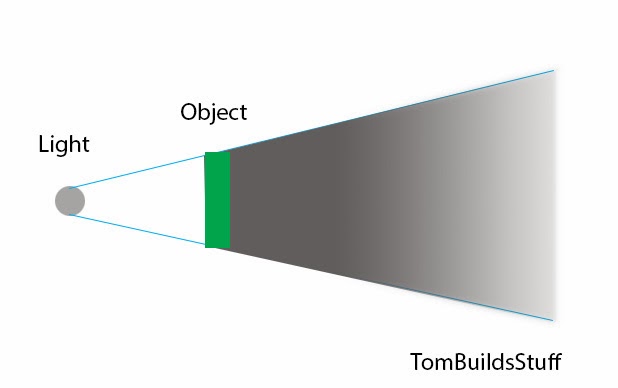
Understanding Shadows
Nothing screams out amateur quality photo more than dark harsh shadows. Lighter, softer shadows make product photos more pleasing and give a more accurate depiction.There are three main parts of a shadow. The umbra, penumbra and antumbra. The umbra is the darkest part of the shadow where all light is obstructed by the object. The penumbra and antumbra are lighter, softer portions of the shadow where some light gets through.
When you use a small light source, like the itty-bitty flash thats built into your camera, the shadow is mostly umbra.
If your light source is large, in relation to the object youre photographing, the umbra becomes smaller and there is a sizable penumbra.
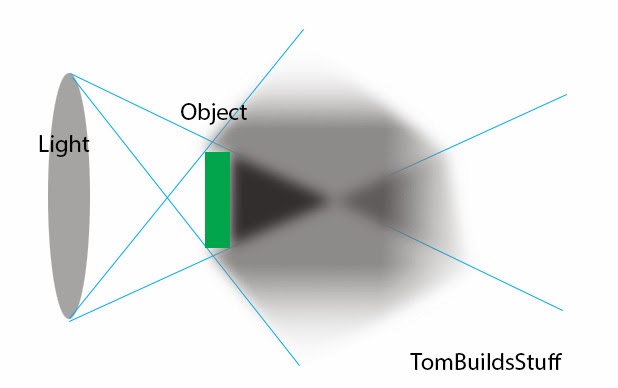
Please excuse the crude diagrams, it should be clearer once you see the sample photos.
The way the light box works is by making your light source effectively larger so you get softer, more pleasing shadows. In addition, all the light bouncing around helps make the shadows lighter and provides more even illumination.
Heres an example. There are more examples at the end of this post.
 |
| DIY Light Box with One light on left |
 |
| On Camera Flash |
 |
| Standard Ceiling Light |
If you dont want to make your own there are a number of different Table Top Studios
What Youll Need
Materials
Ill go into more details on materials throughout the steps but basically, youll need the following:- 2 Sheets of 22" x 28" White Foam Board (or thick package type cardboard).
- 2 Sheets of 22" x 28" White Poster Board (10 pack about $6.50 from Staples)
- 10 small Binder Clips
- Glue Stick or Spray Adhesive
- Packaging Tape
- Diffusion material (see steps for details)
Tools
- Utility Knife
- Scissors
- Straight Edge
- Pencil
- Tape Measure
Cut Plan
You can use either a thick package type cardboard to make the light box or foam core. To standardize things a bit Im using 22" x 28" of foam board for these plans. I was in the middle of recycling when I made mine and wound up using cardboard.My local Staples didnt carry 22x28 foam board except for the tri-fold presentation boards which arent the best choice for this. You might be able to find that size at an art supply store or you can get it online from Amazon.
Here is how well cut the foam core. If youre using cardboard, cut the relevant shapes out of whatever you have. Sizing isnt all that critical except for the 22" width and the 14" depth. I just eyeballed most of it.
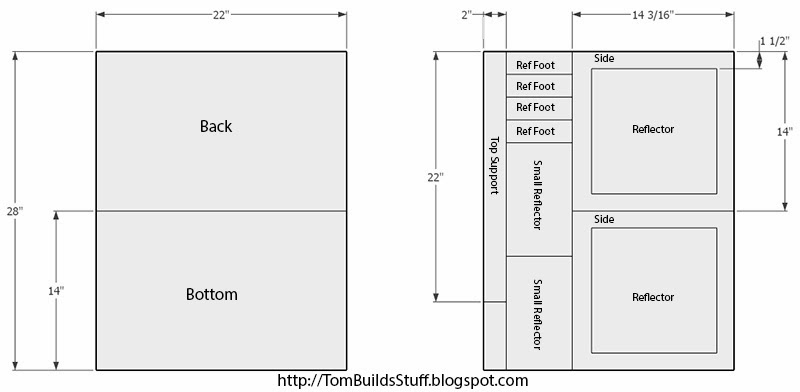
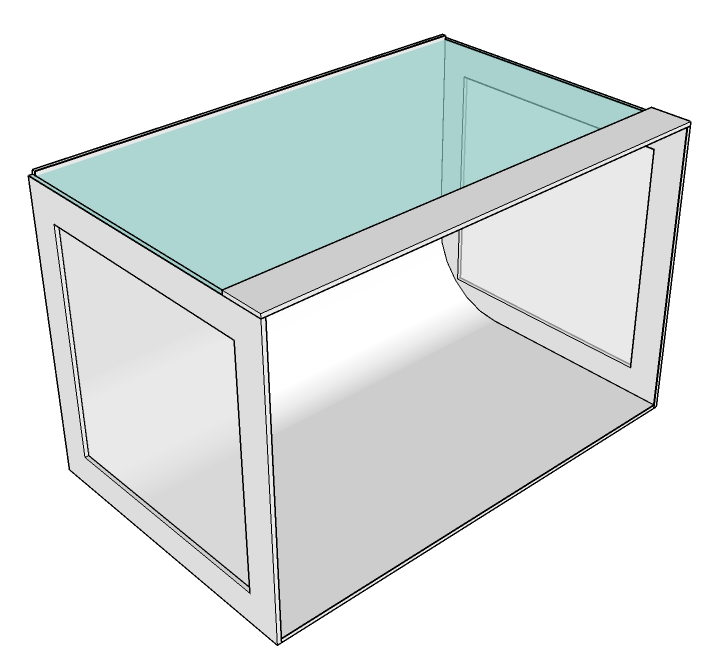
Step 1: Back and Bottom
Take one sheet of 22x28" foam core and score it down the middle (14") so that you can bend it at a 90 degree angle. If youre using cardboard cut 2 14" x 22" pieces and tape them together along the 22" side to form an L like shown.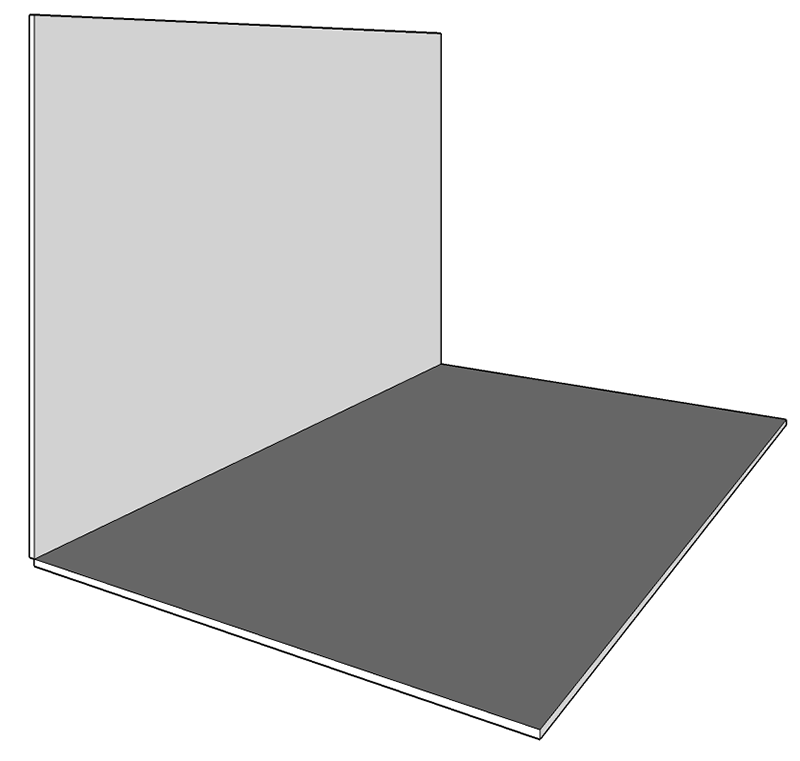
Step 2: Cut Out Sides
The sides are 14" x 14 3/16". The 3/16" comes from using 3/16" thick foam core. Ideally the sides would be 14 3/16" x 14 3/16" but its such a small difference its not worth buying another sheet of foam core for.After you cut the 2 sides, measure and mark a square about 1-1/2" in from all 4 edges and cut it out with a utility knife. Keep this inner portion to use as a reflector later.

Step 3: Apply Diffusion Material To Sides
To make the light effectively larger we need to diffuse it. The standard is to use a white ripstop nylon fabricI just used some white tall kitchen garbage bags as my diffusion material. Two layers worked best for me.
Using glue, attach the diffusion material to the inside of each side so that it covers the entire side. Diffusion material shown in blue for clarity.

Step 4: Attach Sides and Top Support
Cut out a 2" or so strip of foam core or cardboard that is 22" long + 2 times the thickness of the foam core (or cardboard). Attach the sides (with the diffusion material on the inside of the box) and the top support as shown using packing tape.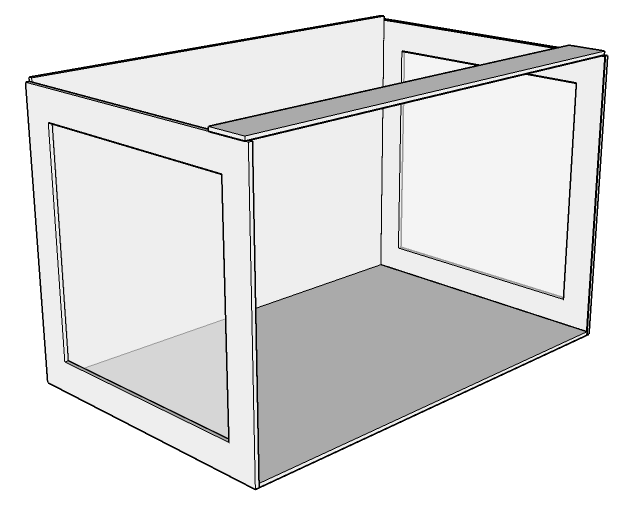
Step 5: Insert Poster Board
The main background of this light box is going to be a 22" x 28" sheet of white poster board. Slide it into the box (shiny side up), leaving a soft curve in the corner and attach it to the back and bottom with the binder clips. The binder clips make it easy to change the background if it gets damaged or to change the color.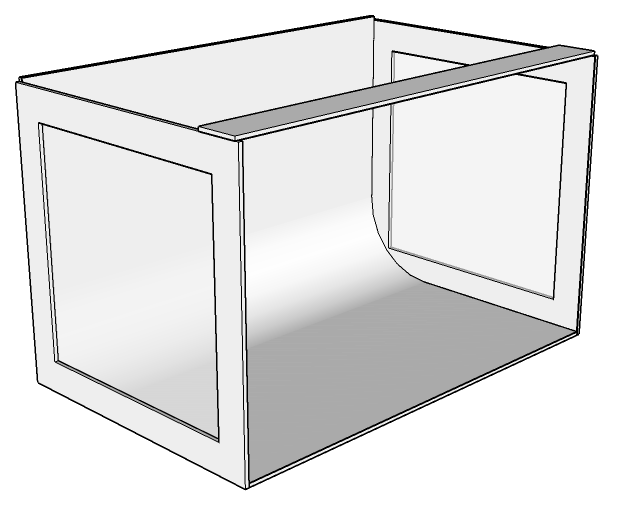
Step 6: Attach Top Diffuser
Cut and attach more of your light diffusing material for the top of your box and attach it with binder clips. I removed the binder clips holding the poster board one by one to attach the top diffuser to the back. Make sure the diffuser passes under the top support, especially if youre using brown cardboard for the frame.The diffuser is blue in the illustration for clarity.
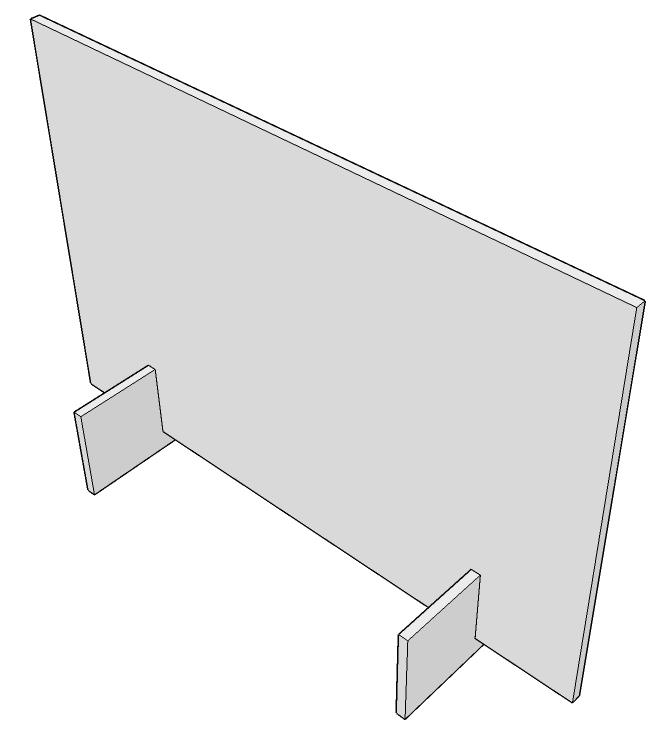
Step 7: Reflectors
To help bounce more light to the front of the object being photographed were going to make some reflectors out of the left over foam core and the inner sections we cut out of the sides. If youre using cardboard, make sure to cover one side with poster board cut to size. You can also cover the back side in a black material to act as a light block if you wish.To keep the reflectors standing up on their own well make 4 feet. Two for each reflector in use.
Cut out 2" high pieces of foam core from the section shown in the cut plan and make a notch in each to slide the reflector in. The width of the notch will depend on the thickness of the material youre using. I was able to just eyeball these cuts. They dont have to be that precise.
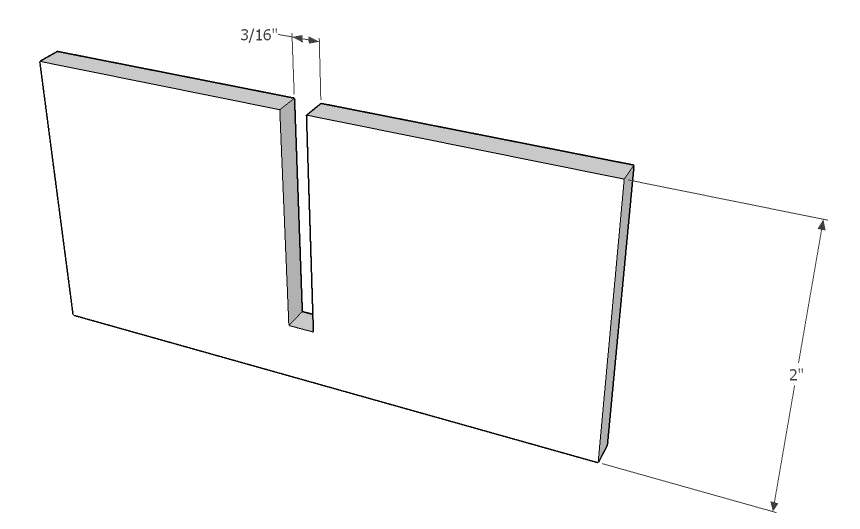
To use the reflectors, just slide 2 feet on to the bottom to make it stand upright.
Using Your Light Tent
Now youll need some lighting to be able to take good photos. This doesnt have to be that complicated as the light box will make most kinds of lights look better.You can use 1, 2, 3 or more lights with your light tent. One on one side, one on each side, one or two on the top, one on each side and also one or two on the top. Different configurations will give you different results. Just make sure you keep the light about 8-12" away from the diffuser.

You can also use small desk lamps or whatever you have handy. Having some sort of reflector is best.
For the bulbs you can pretty much use anything that is a safe wattage to use with the light fixture youve chosen. Modern digital cameras are pretty good at white balancing. Its best to use the same exact type of bulb in each light fixture or you might get strange color casts.
For simplicity and better color reproduction you might want to pick up some of these Alzo Digital 85 Watt 5000K CFL bulbs. They are very bright and produce a color of light that simulates daylight. Just like camera flashes do.
You can also use camera flashes if you have them. For the sample shots below I used a single hot shoe flash
A tripod to mount your camera on is also important, especially if youre using bulbs instead of flashes.
Im using
Sample Photos
This is what my light tent looks like in action. Im using two flashes. One connected to my camera with a cord and the other triggered wirelessly.
Play around with adjusting the lights and reflectors to get different effects. Here are some examples.

Here are some more photos I took of different objects I had lying around after I finished construction of my homemade light tent.
 |
| One Light Left |
 |
| One Light Above with Glossy Background |
 |
| One Light Left |
 |
| One Light Left |
 |
| One Light Top |
 |
| One Light Left |
Subscribe to:
Posts (Atom)