Showing posts with label table. Show all posts

Tuesday, February 18, 2014

DIY Table Top Photo Studio Plans

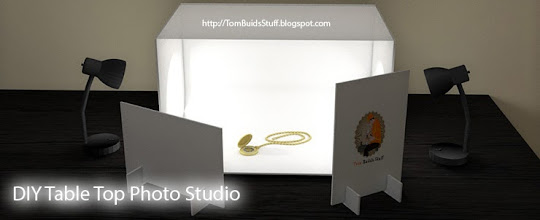
Every so often I try to get rid of things I dont need any more by selling them on Ebay or Craigslist. Ive found that having good photos helps items sell faster and get better prices so I made this little table top light box to take better product photos. It was made mostly of things I had lying around. Here are plans to build one yourself.

Understanding Shadows

Nothing screams out amateur quality photo more than dark harsh shadows. Lighter, softer shadows make product photos more pleasing and give a more accurate depiction.

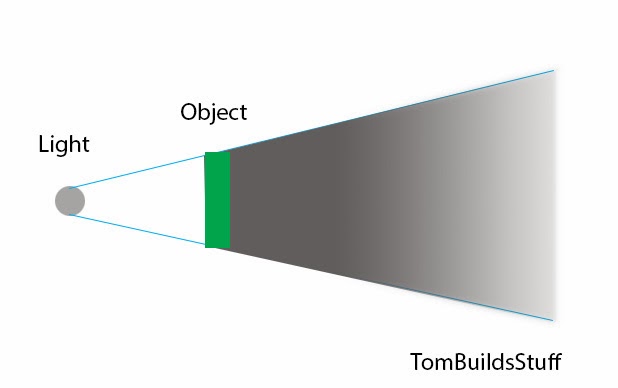
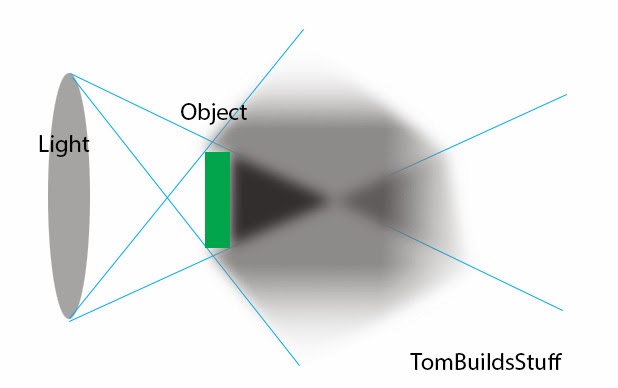
There are three main parts of a shadow. The umbra, penumbra and antumbra. The umbra is the darkest part of the shadow where all light is obstructed by the object. The penumbra and antumbra are lighter, softer portions of the shadow where some light gets through.

When you use a small light source, like the itty-bitty flash thats built into your camera, the shadow is mostly umbra.


If your light source is large, in relation to the object youre photographing, the umbra becomes smaller and there is a sizable penumbra.


Please excuse the crude diagrams, it should be clearer once you see the sample photos.

The way the light box works is by making your light source effectively larger so you get softer, more pleasing shadows. In addition, all the light bouncing around helps make the shadows lighter and provides more even illumination.

Heres an example. There are more examples at the end of this post.

DIY Light Box with One light on left
For comparison lets look at the same light under different lighting using the same white poster board background. First using the cameras built-in pop-up flash, then using incandescent room lights (ceiling) after white balancing.

On Camera Flash

Standard Ceiling Light

If you dont want to make your own there are a number of different Table Top Studios you can buy in different price ranges. Except for the poster board I had everything I needed on hand so decided to build my own to have it ready faster and to save money.

What Youll Need

Materials

Ill go into more details on materials throughout the steps but basically, youll need the following:

  • 2 Sheets of 22" x 28" White Foam Board (or thick package type cardboard).
  • 2 Sheets of 22" x 28" White Poster Board (10 pack about $6.50 from Staples)
  • 10 small Binder Clips
  • Glue Stick or Spray Adhesive
  • Packaging Tape
  • Diffusion material (see steps for details)

Tools

  • Utility Knife
  • Scissors
  • Straight Edge
  • Pencil
  • Tape Measure

Cut Plan

You can use either a thick package type cardboard to make the light box or foam core. To standardize things a bit Im using 22" x 28" of foam board for these plans. I was in the middle of recycling when I made mine and wound up using cardboard.

My local Staples didnt carry 22x28 foam board except for the tri-fold presentation boards which arent the best choice for this. You might be able to find that size at an art supply store or you can get it online from Amazon.

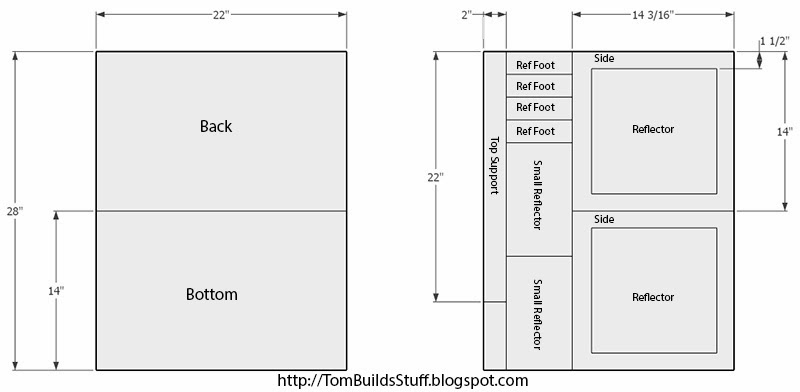
Here is how well cut the foam core. If youre using cardboard, cut the relevant shapes out of whatever you have. Sizing isnt all that critical except for the 22" width and the 14" depth. I just eyeballed most of it.

Step 1: Back and Bottom

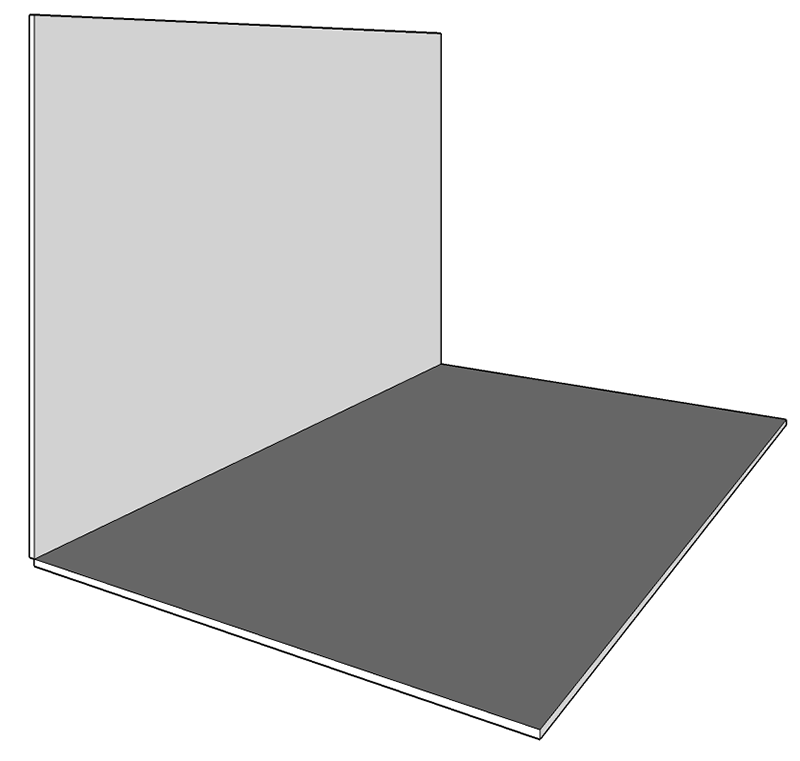
Take one sheet of 22x28" foam core and score it down the middle (14") so that you can bend it at a 90 degree angle. If youre using cardboard cut 2 14" x 22" pieces and tape them together along the 22" side to form an L like shown.

Step 2: Cut Out Sides

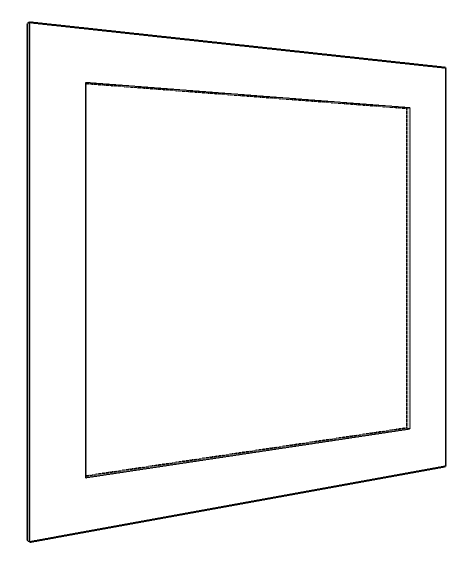
The sides are 14" x 14 3/16". The 3/16" comes from using 3/16" thick foam core. Ideally the sides would be 14 3/16" x 14 3/16" but its such a small difference its not worth buying another sheet of foam core for.

After you cut the 2 sides, measure and mark a square about 1-1/2" in from all 4 edges and cut it out with a utility knife. Keep this inner portion to use as a reflector later.

Step 3: Apply Diffusion Material To Sides

To make the light effectively larger we need to diffuse it. The standard is to use a white ripstop nylon fabric but you can use different items. Ive seen some people use old white t-shirts, tracing paper, parchment paper, wax paper. As long as its semi translucent and white youll get the effect you want though there will be some differences in material.

I just used some white tall kitchen garbage bags as my diffusion material. Two layers worked best for me.

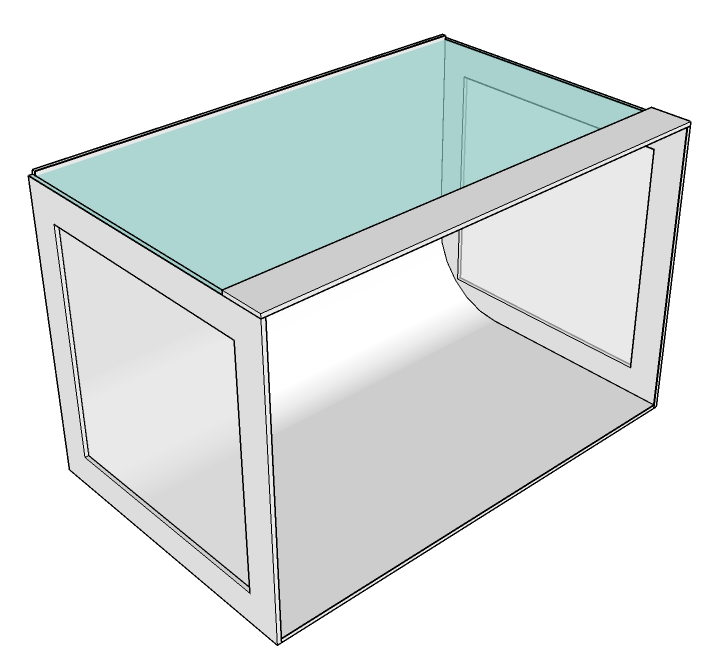
Using glue, attach the diffusion material to the inside of each side so that it covers the entire side. Diffusion material shown in blue for clarity.

Step 4: Attach Sides and Top Support

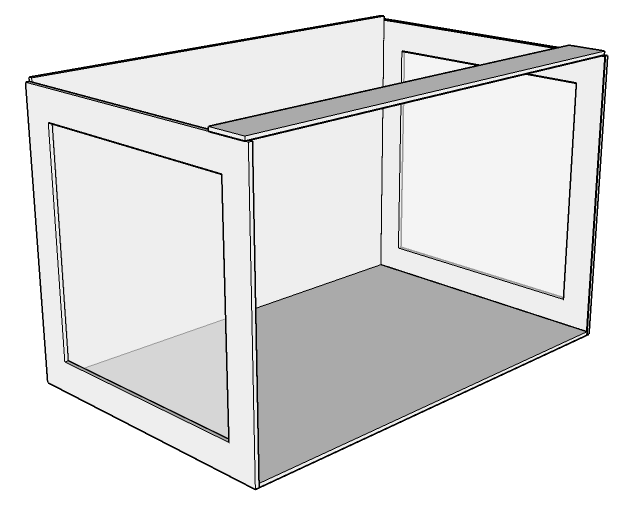
Cut out a 2" or so strip of foam core or cardboard that is 22" long + 2 times the thickness of the foam core (or cardboard). Attach the sides (with the diffusion material on the inside of the box) and the top support as shown using packing tape.

Step 5: Insert Poster Board

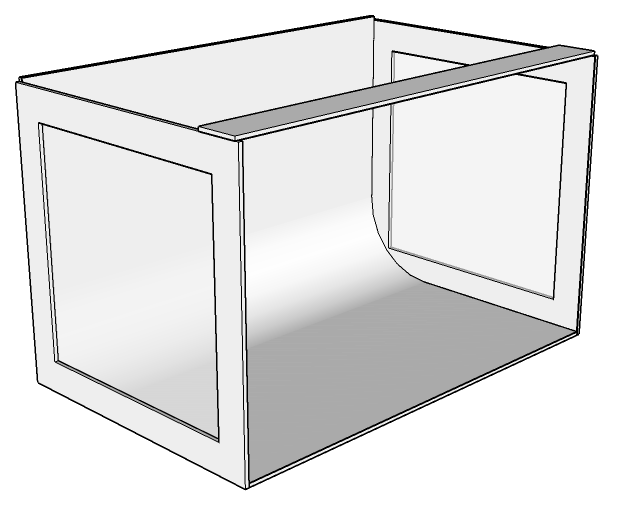
The main background of this light box is going to be a 22" x 28" sheet of white poster board. Slide it into the box (shiny side up), leaving a soft curve in the corner and attach it to the back and bottom with the binder clips. The binder clips make it easy to change the background if it gets damaged or to change the color.

The bottom front of the poster board will hang a little outside the box but thats okay.

Step 6: Attach Top Diffuser

Cut and attach more of your light diffusing material for the top of your box and attach it with binder clips. I removed the binder clips holding the poster board one by one to attach the top diffuser to the back. Make sure the diffuser passes under the top support, especially if youre using brown cardboard for the frame.

The diffuser is blue in the illustration for clarity.

Step 7: Reflectors

To help bounce more light to the front of the object being photographed were going to make some reflectors out of the left over foam core and the inner sections we cut out of the sides. If youre using cardboard, make sure to cover one side with poster board cut to size. You can also cover the back side in a black material to act as a light block if you wish.

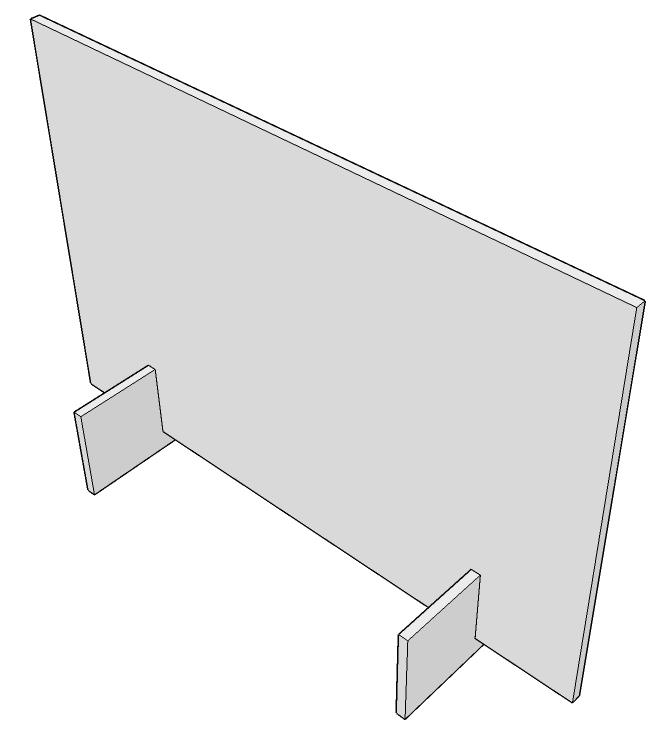
To keep the reflectors standing up on their own well make 4 feet. Two for each reflector in use.

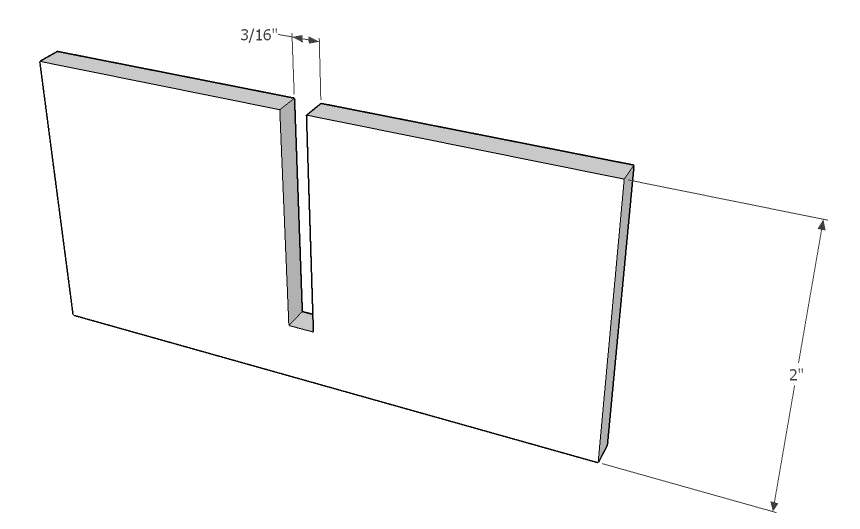
Cut out 2" high pieces of foam core from the section shown in the cut plan and make a notch in each to slide the reflector in. The width of the notch will depend on the thickness of the material youre using. I was able to just eyeball these cuts. They dont have to be that precise.


To use the reflectors, just slide 2 feet on to the bottom to make it stand upright.

Using Your Light Tent

Now youll need some lighting to be able to take good photos. This doesnt have to be that complicated as the light box will make most kinds of lights look better.

You can use 1, 2, 3 or more lights with your light tent. One on one side, one on each side, one or two on the top, one on each side and also one or two on the top. Different configurations will give you different results. Just make sure you keep the light about 8-12" away from the diffuser.

A light fixture with a large reflector is the most effective. It doesnt have to be expensive. You can use those clamp on aluminum reflectors. You can get them from Home Depot or click on the picture to the right to order from Amazon. Just make sure to clamp it on to something secure.

You can also use small desk lamps or whatever you have handy. Having some sort of reflector is best.

For the bulbs you can pretty much use anything that is a safe wattage to use with the light fixture youve chosen. Modern digital cameras are pretty good at white balancing. Its best to use the same exact type of bulb in each light fixture or you might get strange color casts.

For simplicity and better color reproduction you might want to pick up some of these Alzo Digital 85 Watt 5000K CFL bulbs. They are very bright and produce a color of light that simulates daylight. Just like camera flashes do.

You can also use camera flashes if you have them. For the sample shots below I used a single hot shoe flash with an off-camera shoe cord to position the flash in different locations.

A tripod to mount your camera on is also important, especially if youre using bulbs instead of flashes.

Im using

Sample Photos

This is what my light tent looks like in action. Im using two flashes. One connected to my camera with a cord and the other triggered wirelessly.


Play around with adjusting the lights and reflectors to get different effects. Here are some examples.


Here are some more photos I took of different objects I had lying around after I finished construction of my homemade light tent.


One Light Left


One Light Above with Glossy Background


One Light Left


One Light Left


One Light Top


One Light Left
Read More..

Monday, February 3, 2014

Description train table woodworking plans

Useful train table woodworking plans must try

Train Table Woodworking Plans

Train table plans | ehow - ehow | how to videos, articles, Train table plans. a train table is an essential for any model train set. the train table supports the set at a comfortable height for user enjoyment. it also. Squirrel tracks wooden trains - free train table plans, Free plans to make your own train table. squirrel tracks sells brio compatible wooden trains from maxim and thomas & friends.. Toy train table plans - free woodworking plans , furniture, Train table plans - if you are into model trains, then you will surely enjoy free toy train table plans. also free plans for wooden trains and a wall train track..

Train table plans - table details, Build a unique train table with our detailed train table plans. Train sets and train tables | wayfair - buy wood train, Buy train sets & train tables at wayfair. enjoy free shipping & browse our great selection of vehicles, hobby & remote control and more!. Free train table plans - squidoo, Free tain table plans craftsman train table plan overview: it was intended to be the perfect place for the kids to build their holiday train set..

Free toy train woodworking plans from shopsmith, Download free woodworking plans and build this toy train compliments of your woodworking friends at shopsmith . free patterns include drawings, material and cutting. Modular lego train table assembly plans - baylug, The original idea for these tables came from plans by ben fleskes, one of the founding members of the pacific northwest lego train club (pnltc).. Train track router bits and free plan - woodworking tools, These carbide-tipped bits let you create classic wooden toy train tracks, similar to the expensive store-bought track.double groove bit cuts.


#1: train table woodworking plans its good


train table woodworking plans
,

8 out of 10 based on 21 ratings
Read More..

Saturday, February 1, 2014

Jefferson woodworking drop leaf table

#1: Jefferson woodworking drop leaf table

Jefferson Woodworking Drop Leaf Table

Drop-leaf table woodworking plan - wood store, Drop-leaf table - big enough to seat six or small enough for two, this table expands to fill a dining room or shrinks to fit a coy breakfast nook. overall dimensions. Amazon.com - winsome wood 42-inch round drop leaf table, Straightforward and economical, this winsome wood 42-inch round drop leaf table doesn't scrimp on quality: sturdy solid wood construction and subtle tailoring make it. Drop-leaf table - popular woodworking magazine, In our living room, we keep a mahogany table that i vaguely knew one of my ancestors had built. after i began my internship at this magazine, i became more interested.

Amish solid wood 12” drop leaf table, This amish drop leaf leg table is unique in that it has 12. Drop leaf dining table | ebay - electronics, cars, fashion, Find great deals on ebay for drop leaf dining table in antique tables from the early 1900's. shop with confidence.. 12" drop leaf support for tables without aprons - rockler, Drop leaf support for tables without aprons.perfect for tables with a large overhang, the 2-1/4 high mounting bracket on this specialty drop.

Preview - a shaker style drop-leaf table - fine, A shaker style drop-leaf table turned legs with drilled-and-chiseled mortises. by greg isaak. Gate leg drop leaf table plans - mlcs woodworking, Gate leg drop leaf table plans completing the table leaves: the table leaves are rounded on the end and should be cut with a circle cutting jig (mlcs #9308 curv pro. Classic shaker-style drop-leaf table project / rockler how-to, This drop-leaf table was designed based on a classic plan from woodworker's journal magazine 20 before, but modernized..


Read More..

Thursday, January 30, 2014

Used woodworking table saws

This Used woodworking table saws Best choice

Table saws for woodworking - about.com woodworking, Table saws are the among most versatile of all home woodworking machines. learn how to find the best table saw for your workshop.. Twelve table saw safety tips - safe woodworking - table, The table saw is probably the most widely-used woodworking machine in the woodshop. statistically, it is also likely the most dangerous, as more debilitating injuries.

Used woodworking machinery, new & used woodworking, New & used woodworking machinery and equipment; a huge online selection including detailed descriptions & photos of woodworking machines like cnc routers, wide belt. Table saw - wikipedia, the free encyclopedia, A table saw or sawbench is a woodworking tool consisting of a circular saw blade, mounted on an arbor, that is driven by an electric motor (either directly, by belt.

Table saw - wikipedia, the free encyclopedia, A table saw or sawbench is a woodworking tool consisting of a circular saw blade, mounted on an arbor, that is driven by an electric motor (either directly, by belt. Used woodworking machinery, Used woodworking machinery. maquinaria usada para la madera. maquinaria para aserraderos.. Pre-owned woodworking machinery - local & national, First choice industrial is a full-service distributor of used & new woodworking machinery and equipment for woodworking, aerospace, marine and sign-making applications.. Ex-factory woodworking machinery – used, new, A source of new and used equipment used for solid wood, panel and other wood industry processing. plus leasing, appraisal, liquidation, auction, installation and. Machinerymasters - used woodworking machines | new, Buys and sells new and used machine tools and woodworking machinery, largely through repossessions by lending institutions. details of current inventory.. Table saws - sawdust making, This is probably a woodworkers first major purchase, there are several basic categories of table saws on the market, bench or jobsite.

Read More..

Tuesday, January 28, 2014

A Distressed Walnut Table Top


Were working on a distressed walnut table top for a client who has a masonry pedestal. Were just making the top and the apron/stiffener. Its nearly finished and looking pretty good. Click the photos to enlarge them ...

The rough lumber form Irion Lumber in PA ... Beautiful boards, all from the same log.

Glued up and cut to round with a circle cutting jig on the bandsaw.
Heres one way to do it ... circle cutting jig There are simpler ones, like a board and a nail

We like this next process. Its quite fun. You move the pin that you use to cut the table round out away from the blade and one person spins the table (Trevor in this case) and one person (me in this case) holds the belt sander square and level. Once that kicks in, then you actually have to keep the top from spnning too fast. Sanding the cut edge this way takes only a couple of minutes .... Dont skip grits .... Dont let it take off ....

Trevor mortised the six round apron parts with the domino and glued them up in a circle using the band clamp, adding small moldings to the bottom edge to reinforce the glue joints.

View of the table bottom.
More later this week as its completed

The clients pedestal
Read More..

Monday, January 27, 2014

Herringbone Table Progress

Over the weekend David named this MEGA PROJECT, and for good reason, we were basically a lumber mill without the correct equipment. It was A LOT of cutting! Well go into that more when we post a tutorial ... but for now, check out our progress!


Rough pieces of driftwood were cut down to 1x4 pieces of wood to give a variety of color and texture. LOVE!


For the edges, I held a piece up and marked the cut with a pencil and then David cut with the miter saw (so much faster with two people!)


Weve finished everything but two edges, then well be almost done with the top!


Youve probably guessed by now, but it is going to be a coffee table for our living room ... check back for progress!
Read More..

Tuesday, January 21, 2014

Benchtop router table woodworking plan

Useful Benchtop router table woodworking plan must see

Benchtop router table woodworking plan, shop project plan, Benchtop router table woodworking plan, shop project plan | wood store - why this project belongs in your shop • you can put it together in a weekend for less than. Benchtop router table: downloadable woodworking plan, Benchtop router table: downloadable woodworking plan [editors of wood magazine] on amazon.com. *free* shipping on qualifying offers. why does this project belongs in.

Router Table Plans – 17 Top Tips On How to Build a Router Table

Bench dog 40-001 protop contractor benchtop router table, Product reviews for bench dog 40-001 protop contractor benchtop router table. Benchtop router table reviews |, Benchtop router table reviews presents you unbiased reviews of the best bench router tables on the market from all the big brands as bench dog, bosch, kreg and many more..

Benchtop router table reviews |, Benchtop router table reviews presents you unbiased reviews of the best bench router tables on the market from all the big brands as bench dog, bosch, kreg and many more.. Bosch ra1181 benchtop router table - amazon.com, The bosch ra1181 benchtop router table provides a large work surface for woodworking and routing. designed to fit a variety of routers, this router table is a. Router table plan - build a woodworking router table, Woodworking plans for immediate download from plansnow.com. Router tables: get tables for routers, wood routers, Like the pros, you can increase your safety, control, and accuracy by using a router table in your wood shop.. Router table, cabinet, storage woodworking plan, shop, Router table, cabinet, storage woodworking plan, shop project plan | wood store - when your router accessories have scattered around the shop like chips flung from a. Complete router table woodworking plan - plansnow, Woodworking plans for immediate download from plansnow.com.

Router table details drawing by Rockler


Router table details drawing by Rockler

Woodworking Router Table Where to download the Router table plans for


Woodworking Router Table Where to download the Router table plans for

Router Table Plans – 17 Top Tips On How to Build a Router Table


Router Table Plans – 17 Top Tips On How to Build a Router Table

Read More..

Thursday, January 16, 2014

Get Farm table woodworking plans

#1: Farm table woodworking plans Best choice

Ana white | build a farmhouse table | free and easy diy, Free plans to help anyone build simple, stylish furniture at large discounts from retail furniture. all woodworking plans are step by step, and include table plans. Ana white | build a fancy x farmhouse table | free and easy, Free plans to help anyone build simple, stylish furniture at large discounts from retail furniture. all woodworking plans are step by step, and include table plans.

Pedestal Picnic Table – Woodworking Project | Free Wood Plans.com

Farmhouse table plans | free outdoor plans - diy shed, wooden, This step by step diy woodworking project is about farmhouse table plans. building a dinning table out of wood is easy, if you follow the diagrams and instructions. The feminist mystique: diy rustic wood coffee table/farm table, After letting the boards dry overnight, we positioned them on the coffee table and measured carefully to make sure the ends and sides hung off the table.

The feminist mystique: diy rustic wood coffee table/farm table, After letting the boards dry overnight, we positioned them on the coffee table and measured carefully to make sure the ends and sides hung off the table. Farmhouse tables - ecustomfinishes, Makers of custom farmhouse tables and custom furniture, made from reclaimed barn wood. choose from dozens of custom options, and colors, sizes and styles. highest. Farm table plans | free outdoor plans - diy shed, wooden, This step by step diy woodworking project is about farm table plans. if you want to learn how to build a nice and rustic farm table, read the instructions.. Free woodworking plans for building a toddler farmhouse table, Plain text. no html tags allowed. web page addresses and e-mail addresses turn into links automatically. lines and paragraphs break automatically.. Woodworking plans plans, Free woodworking plans plans ,get woodworking tips, techniques, project plans. Barn wood dining table plans? - woodworking talk - woodworkers, Does anyone have any good plans to make a big dining room table (seats 10) out of reclaimed barnwood?.

table plans woodworking | Free Woodworking Plan


Table plans woodworking | Free Woodworking Plan

Ranch Fence Gate Ideas Gallery - Ranch Driveway Gates - Ranch Gates


Ranch Fence Gate Ideas Gallery - Ranch Driveway Gates - Ranch Gates

Pedestal Picnic Table – Woodworking Project | Free Wood Plans.com


Pedestal Picnic Table – Woodworking Project | Free Wood Plans.com


Nice Farm table woodworking plans Best choice


Farm table woodworking plans
,

9 out of 10 based on 33 ratings
Read More..